
Manual Blood Pressure Apparatus Simulator with Korotkoff Sounds
Take a blood pressure the way nurses learn it: squeeze the bulb, open the valve to drop 2–3 mmHg a second, listen for the Korotkoff sounds and read the mercury at eye level. Then see how a wrong cuff, a dangling arm or a fast deflation changes the reading.
Experiment
Cuff emptyMaria, 340 mmHg/s
Right now
Cuff (column)—
Deflation rate—
Sound now—
Pulse rate—
True pressure now—
Digital estimate—
Your last reading—
Category—
Patient & cuff size
Bladder 16 × 30 cm, for arms 27–34 cm.
Mid-arm circumference29 cmfits the adult cuff
Position
Rested 10 min
Bulb & release valve
0.0 mmHg/s holding
Stethoscope & pulse
Chest piece on
Side
🎧 Headphones make the low Korotkoff thuds much clearer than laptop speakers.
Mistakes to try
Faulty instrument
Lab
View & learning aids
Click the bulb to squeeze it (hold to keep pumping), drag the valve's thumbscrew sideways, drag the stethoscope, click the wrist to feel the pulse. In the Column view drag the eye up and down.
Speed
What is happening
Lab notebook
Your readings are written here when you press Record. Export a CSV, or turn the session into a PDF lab report.
| # | Patient | Conditions | Reading | Result |
|---|
Concept library
Click "New question" to begin.
Click "Start quiz" for 5 questions on reading a mercury column, the instrument, the method, the Korotkoff sounds, errors and the blood pressure categories.
User Guide: Manual Blood Pressure Apparatus Simulator
1 Overview
Simulate puts a desk mercury sphygmomanometer, a cuffed arm, the bulb and a stethoscope on the bench; the right-hand card shows the top of the mercury close up, the artery under the cuff, a pressure graph or the sounds. Experiment has seven practicals that end in a PDF lab report, and Quiz has a practice quiz with worked answers and a 5-question quiz. The mercury, the air in the cuff, the patient's pulse and the sounds all come from one physical model, so they always agree. It is an educational model, not medical advice.
2 Taking a reading
- Check the patient is ready (the Patient card in the corner turns green) and the cuff fits the arm.
- Close the valve, then squeeze the bulb (click it, hold the 🤜 button, or hold Space) until the mercury is about 30 mmHg above where you expect the systolic.
- Open the valve a little (drag the thumbscrew, use the Valve slider, or the 2–3 mmHg/s button). The rate meter turns green between 2 and 3 mmHg per second; open it a little more as the pressure falls.
- Listen. At the first two clear taps press Mark systolic; when the sounds disappear press Mark diastolic. Then Record and write what you read, to the nearest 2 mmHg.
- Let all the air out before you start again.
3 Reading the mercury
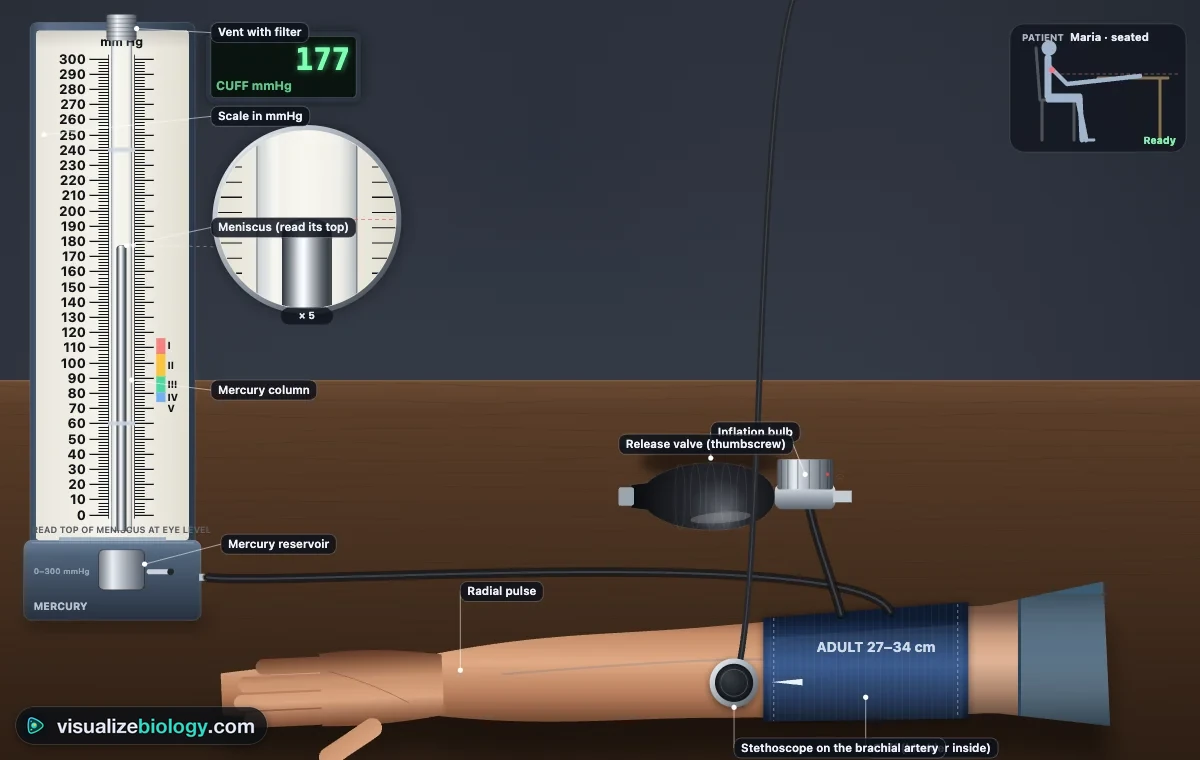
The scale goes from 0 to 300 mmHg with a mark every 2 mmHg and a number every 10. Read the top of the convex meniscus with your eye level with it. The Column view shows it at about 9× life size: drag the eye up or down to see parallax (eye too high reads low, too low reads high). In 2D the Magnifier follows the meniscus at 5×; in 3D, Eye level puts the camera at the height of the mercury. Between systolic and diastolic the mercury bounces a little with each beat.
4 Listening and feeling the pulse
The stethoscope starts on the brachial artery in the elbow crease. Drag it (or use the Listen panel) under the cuff's edge or off the artery to hear the difference; switch between the diaphragm and the bell, and set the volume. Feel radial pulse (or click the wrist) puts two fingers on the radial artery: the pulse vanishes as the cuff passes the systolic pressure, which is the palpatory estimate. The Sounds view draws each sound in its phase color, and Artery shows why it happens.
5 Patients, mistakes and faults
Choose one of thirteen patients in the command bar, from a healthy adult to stage 2 hypertension, a crisis, an athlete with a slow pulse, pregnancy and a child (where phase IV may be needed), atrial fibrillation, a patient who is dizzy on standing and one with an auscultatory gap. The Patient panel sets the cuff size, position, rest and exercise. Mistakes switches on talking, crossed legs, a full bladder, an unsupported back or arm, recent coffee, a cuff over a sleeve and the arm's height, and three faults of the instrument: mercury below zero, a clogged vent (the column lags and reads high) and a leaking valve.
6 Learning aids and "Show me"
The digital readout on the base shows the cuff pressure and, after a slow deflation, the estimate an automatic (oscillometric) monitor would make. The Korotkoff color band beside the tube shows where each phase lies for this patient. Labels name every part. ▶ Show me takes a full reading for you, step by step. Speed ½× and ¼× slow everything down. All of these are switched off in Experiment mode.
7 Experiment mode and the lab report
Seven practicals: take a manual blood pressure (graded like a nurse aide skills test), read the mercury column, the auscultatory gap, the wrong cuff size, arm position and gravity, deflating too fast, and exercise. Each shows its aim, what you need and a safety note; the method ticks off as you work, a conclusion question checks your result, and Create lab report builds a PDF with your readings and calculations.
8 Quiz, units and keyboard
- The practice quiz has seven topics, including pictures of the column to read; Take the quiz gives five mixed questions and a star rating.
- SI | US shows arm sizes and heights in centimeters (with kPa beside mmHg) or in inches. Blood pressure stays in mmHg in both, as in every clinic.
- Keys: Space or ↑ squeeze (hold to pump), ← / → close or open the valve, R let all the air out, M mark systolic then diastolic, Enter record, F feel the pulse, L labels, 1–4 the right-hand views, S Status. A plain scroll over the 3D bench scrolls the page; hold Ctrl or ⌘ to zoom. Right-click a view to save it or copy the readings.
How to take a blood pressure manually with a BP apparatus (mercury sphygmomanometer)
A sphygmomanometer measures blood pressure by squeezing the brachial artery with an inflatable cuff and finding the cuff pressures at which blood starts and stops getting through. With a stethoscope you hear this as the Korotkoff sounds; with the mercury column you read the pressure in millimetres of mercury (mmHg). This simulator lets you practise the whole manual method, ear and eye together, and see why each step of the procedure matters.
In many hospitals and nursing schools, especially in India and the Gulf, the sphygmomanometer is simply called the BP apparatus. This virtual BP apparatus works as a free blood pressure apparatus trainer: a BP measurement simulator you can use before you practise on a classmate, on any laptop, Chromebook or phone.
- Instrument
- A desk mercury column: 3.9 mm bore, 0–300 mmHg, a mark every 2 mmHg, compensated scale (1 mmHg = 0.99 mm)
- You can
- Inflate, deflate at a rate you set, listen, palpate, read the meniscus at eye level, and record to the nearest 2 mmHg
- Views
- 2D and 3D bench, column close-up with parallax, the artery under the cuff, pressure graphs and a phonogram
- Modes
- Simulate (with a guided demonstration), Experiment (7 practicals) and Quiz
- Price
- Free, no account or download; works on Chromebooks, tablets and phones
How a mercury sphygmomanometer works
The instrument is a U-tube. A wide reservoir of mercury at the bottom is joined to a narrow glass tube in front of the scale, and the cuff's air presses on the mercury in the reservoir. Mercury is 13.6 times denser than water, so a modest pressure lifts it only a short way: 1 mmHg is the pressure of a 1 mm column (133.3 Pa). As the mercury rises in the tube, the level in the reservoir falls a little, so the scale is compensated: each printed millimetre is slightly shorter than a real one. A porous vent at the top lets air in and out but keeps the mercury in. Mercury does not wet glass, so its surface (the meniscus) is domed: always read the top of the dome with your eye level with it, and check that it rests exactly on zero before you start. Many hospitals have replaced mercury with aneroid and digital devices under the Minamata Convention, but the mercury column is still the reference that others are checked against.
Step by step: the manual (auscultatory) method
- Prepare the patient. No caffeine, exercise or smoking for 30 minutes, an empty bladder, then 5 minutes seated with the back supported, feet flat and legs uncrossed. Nobody talks.
- Choose and place the cuff. Bare arm, resting at heart level; the bladder about 80 % of the arm's circumference long and 40 % wide; the lower edge 2–3 cm above the elbow crease, the artery mark over the brachial artery.
- Estimate the systolic by palpation. Feel the radial pulse, inflate until it disappears, note the pressure and let the cuff down.
- Listen. Put the stethoscope over the brachial artery, inflate to 30 mmHg above the palpated pressure, then let the mercury fall 2–3 mmHg per second.
- Read and record. The first of two clear taps is the systolic pressure; where the sounds disappear is the diastolic. Record both to the nearest 2 mmHg, for example "128/82 mmHg, right arm, seated", and take a second reading 1–2 minutes later.
The five Korotkoff sounds
| Phase | What you hear | What it means |
|---|---|---|
| I | Clear, repeated tapping that grows louder | The first two taps mark the systolic pressure |
| II | Softer swishing or murmur | Turbulent flow through the partly open artery |
| III | Crisper, louder taps | The artery snaps open with each beat |
| IV | Sudden muffling, a soft blowing sound | Recorded as the diastolic when sounds go on to zero (pregnancy, children, exercise) |
| V | Silence | The diastolic pressure in adults: the artery stays open and flow is smooth |
In some older people with stiff arteries the sounds vanish for 20–40 mmHg in phase II and come back: the auscultatory gap. If you inflate only into the gap you record a systolic far too low, which is why the palpatory estimate comes first.
Blood pressure cuff sizes
| Mid-arm circumference | Cuff | Bladder |
|---|---|---|
| 22–26 cm | Small adult | 12 × 22 cm |
| 27–34 cm | Adult | 16 × 30 cm |
| 35–44 cm | Large adult | 16 × 36 cm |
| 45–52 cm | Adult thigh | 16 × 42 cm |
Common errors and how much they change the reading
| Mistake | Effect |
|---|---|
| Cuff too small | Reads high: about +5 mmHg when a large cuff was needed, +20 when a thigh cuff was (Cuff(SZ) trial) |
| Arm below heart level | Reads high by ρgh, about 0.78 mmHg for each cm (8 mmHg for 10 cm) |
| Talking, full bladder, crossed legs | Raise the pressure by roughly 10, 10–15 and 5–8 mmHg |
| Back or arm unsupported | Raise the diastolic by about 6 mmHg |
| Deflating too fast | Systolic read too low and diastolic too high: you can miss up to one beat's worth of fall |
| Eye above or below the meniscus | Parallax: a few mmHg low or high |
Blood pressure categories
The ACC/AHA guideline (2017, kept in 2025) classes an adult's average reading as normal below 120/80 mmHg, elevated at 120–129 with diastolic below 80, stage 1 hypertension at 130–139 or 80–89, stage 2 at 140 or 90 and above, and a hypertensive crisis above 180 or 120. One reading never makes a diagnosis; children are judged against percentiles for their age, sex and height. The circulation behind these numbers is the subject of the Heart and Cardiac Cycle Simulator.
Who uses this simulator?
High-school biology and health-science classes use it to connect pressure, the circulation and homeostasis to a real measurement; nursing, nurse aide (CNA), medical assisting and HOSA students use it to practise the skill before checking off on a classmate, because a manual reading is graded to within a few mmHg. Teachers project it to ask "what will this cuff read?" before pressing the button. It is an educational model built from published physiology, not a medical device: anyone worried about their blood pressure should see a doctor or nurse.
Frequently asked questions
How do you take a blood pressure manually?
Seat the patient for 5 minutes with the back supported, feet flat, legs uncrossed and the bare arm resting at heart level, and do not talk. Wrap a cuff that fits the arm with its lower edge 2–3 cm above the elbow crease and the artery mark over the brachial artery. Feel the radial pulse, inflate until it disappears and note that pressure, then let the cuff down. Put the stethoscope over the brachial artery, inflate to 30 mmHg above the pressure where the pulse vanished, and open the valve so the mercury falls 2–3 mmHg per second. The first of two clear taps is the systolic pressure and the point where the sounds disappear is the diastolic. Record both to the nearest 2 mmHg, for example 128/82 mmHg.
What are the 5 Korotkoff sounds?
They are the five phases of sound heard through a stethoscope as a blood pressure cuff deflates. Phase I is the first clear, repeated tapping, and marks the systolic pressure. Phase II is a softer swishing or murmur. Phase III is a crisper, louder tapping. Phase IV is a sudden muffling to a soft, blowing sound. Phase V is silence: the point where the sounds disappear is the diastolic pressure in adults. When the sounds go on almost to zero, as in pregnancy, in children or after exercise, phase IV is recorded as the diastolic.
What size blood pressure cuff do I need?
Measure the circumference of the upper arm halfway between the shoulder and the elbow. The cuff's inflatable bladder should be about 80 % of that length and 40 % of it wide. The American Heart Association sizes are: small adult for 22–26 cm, adult for 27–34 cm, large adult for 35–44 cm, and adult thigh cuff for 45–52 cm. A cuff that is too small reads too high (by about 5 to 20 mmHg in a large arm) and a cuff that is too big reads a little low.
Explore related simulators
See the pressure wave that the cuff is listening to, beat by beat, in the Heart and Cardiac Cycle Simulator. Watch blood pressure drive filtration in the glomerulus in the Kidney Simulator, and see how exercise raises breathing as well as blood pressure in the Respiratory System Simulator. Follow the hormones that raise blood pressure in fight or flight in Hormone Quest, and read another precision instrument, a microscope's fine focus, in the Virtual Microscope.
Sources: Muntner et al. 2019, Measurement of Blood Pressure in Humans, AHA Scientific Statement (Hypertension 73: e35); Pickering et al. 2005 (Circulation 111: 697); Whelton et al. 2018, 2017 ACC/AHA High Blood Pressure Guideline, and Jones et al. 2025, AHA/ACC guideline; Ishigami et al. 2023, Cuff(SZ) trial (JAMA Internal Medicine); Cavallini et al. 1996 (auscultatory gap); OpenStax Anatomy and Physiology 2e, section 20.2; American Diagnostic Corporation and EBME notes on mercury sphygmomanometers (bore, vent, maintenance). The simulator is an educational model, not medical advice: see a doctor or nurse about your own blood pressure.
Updated